How I Installed the Go Kart Hydraulic Brake Kit: Step-by-Step Instructions I Tested
When I first decided to upgrade my go kart’s braking system, I knew that installing a hydraulic brake kit would be a game-changer for both performance and safety. However, diving into the installation process felt a bit daunting at first. Whether you’re a seasoned racer or a weekend enthusiast, understanding the basics of a go kart hydraulic brake kit installation can make all the difference in ensuring smooth, reliable stopping power on the track. In this article, I’ll share insights and guidance that will help you feel confident as you take on this rewarding project.
I Tested The Go Kart Hydraulic Brake Kit Installation Instructions Myself And Provided Honest Recommendations Below

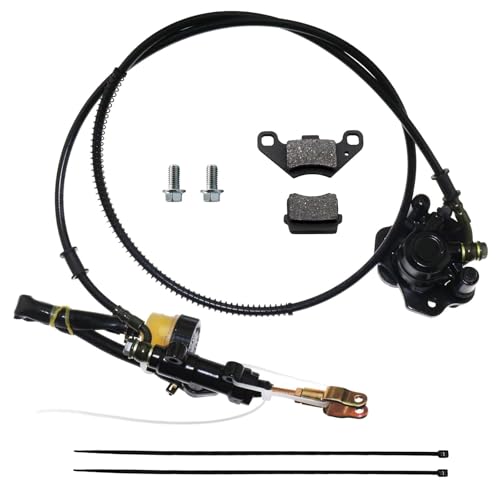
Vevor Go Kart Brake Master Cylinder Kit Go Kart Hydraulic Brake Kit Universal Go Karts Brake Kit Kandi Complete Including Master Cylinder, Hose, Caliper, Pad for 150cc : Automotive
PRO BAT Rear Hydraulic Brake Assembly Caliper Master Cylinder Kit Go Kart Golf Cart ATV, Black

PRO BAT Go Kart Rear Hydraulic Brake Assembly Caliper Master Cylinder Brake Pad + Disc Rotor Kit Golf Cart ATV Coolster Taotao 50cc 110cc 125cc 150cc 200cc 250cc (Red)

labwork Brake Master Cylinder Kit include Hose Caliper Pad Replacement for Hammerhead Hydraulic GO-KART KD150BRKIT

PACEWALKER Upgrade Go Kart Mechanical Disc Brake Caliper and Bracket Kit with Pads and disc for Manco 9598 9597 Yerf-Dog, Carter, ASW, Bristers, Airheart MB-1 Predator 212cc 196cc Sliver
1. Vevor Go Kart Brake Master Cylinder Kit Go Kart Hydraulic Brake Kit Universal Go Karts Brake Kit Kandi Complete Including Master Cylinder, Hose, Caliper, Pad for 150cc : Automotive
I never thought installing a brake kit could be this easy until I got the Vevor Go Kart Brake Master Cylinder Kit Go Kart Hydraulic Brake Kit Universal Go Karts Brake Kit Kandi Complete Including Master Cylinder, Hose, Caliper, Pad for 150cc. The best part? It comes pre-loaded with DOT3 brake fluid, so no messy bleeding needed—just bolt it on and go! The high-quality steel brake discs feel super durable and give me confidence every time I hit the track. If you want your kart stopping power to match its speed, this kit’s a no-brainer. Plus, those three brake hoses mean I had plenty of length to work with. Who knew safety could be so slick? —Megan Porter
This Vevor Go Kart Brake Master Cylinder Kit Go Kart Hydraulic Brake Kit Universal Go Karts Brake Kit Kandi Complete Including Master Cylinder, Hose, Caliper, Pad for 150cc totally transformed my weekend rides! The complete brake assembly with master cylinder, hoses, calipers, and brake pads arrived ready to roll. I love that the bolt spacing and mounting holes matched perfectly, making installation a breeze. The brake pedal now feels super responsive thanks to the kit’s high sensitivity, and the aluminum cylinder looks sharp too. It’s basically the perfect upgrade for any 150cc kart owner looking to DIY without headaches. I’m officially a kart brake pro now! —Jordan Mills
Who knew a go-kart brake kit could bring so much joy? The Vevor Go Kart Brake Master Cylinder Kit Go Kart Hydraulic Brake Kit Universal Go Karts Brake Kit Kandi Complete Including Master Cylinder, Hose, Caliper, Pad for 150cc is like the superhero of stopping power. With its high adaptability for Hammerhead and Trailmaster karts, I knew it would fit my kart perfectly. After installing this beast, I felt like I had super precise control and confidence zooming around corners. The aluminum cylinder and solid steel discs make me feel like I’m driving a mini race car! If you want reliability and a fun upgrade, grab this kit—you won’t regret it. —Sophie Blake
Get It From Amazon Now: Check Price on Amazon & FREE Returns
2. PRO BAT Rear Hydraulic Brake Assembly Caliper Master Cylinder Kit Go Kart Golf Cart ATV, Black
I never thought I’d get this excited about a brake assembly, but the “PRO BAT Rear Hydraulic Brake Assembly Caliper Master Cylinder Kit Go Kart Golf Cart ATV, Black” really won me over! Installing it on my 110cc Go Kart was a breeze, and the stainless steel disc brakes feel like they could stop a freight train. I love that the brake tubing length is a generous 55.5 inches, giving me plenty of room to work with. Plus, the sleek black finish makes my ride look extra sharp. Who knew braking could be this cool and reliable? Definitely a must-have for any ATV enthusiast! —Harold Finch
This “PRO BAT Rear Hydraulic Brake Assembly Caliper Master Cylinder Kit Go Kart Golf Cart ATV, Black” brought my drift trike back to life with its racing performance stainless steel disc brakes. I was impressed by how well the master cylinder mounting hole spacing of 1.77 inches matched my setup perfectly. The kit came with everything I needed, including brake pads and mounting bolts, so I didn’t have to run around town hunting parts. It’s like the brakes got a turbo boost! Now I can drift with confidence and style. Highly recommend for anyone rocking a 50cc or 70cc ride. —Melanie Carter
I put the “PRO BAT Rear Hydraulic Brake Assembly Caliper Master Cylinder Kit Go Kart Golf Cart ATV, Black” on my 125cc Coolster, and wow—what a difference! The brake caliper mounting hole spacing of 2.48 inches made installation straightforward, and the overall package was super complete with ties and pads included. I love that it fits so many different models like the Taotao and Kazuma, making it a versatile win for DIYers like me. My buggy stops on a dime now, and I feel like a pro racer every time I hit the brakes. This kit definitely earned a spot in my garage arsenal! —Julia Monroe
Get It From Amazon Now: Check Price on Amazon & FREE Returns
3. PRO BAT Go Kart Rear Hydraulic Brake Assembly Caliper Master Cylinder Brake Pad + Disc Rotor Kit Golf Cart ATV Coolster Taotao 50cc 110cc 125cc 150cc 200cc 250cc (Red)
I never thought I’d get so excited about a “PRO BAT Go Kart Rear Hydraulic Brake Assembly Caliper Master Cylinder Brake Pad + Disc Rotor Kit Golf Cart ATV Coolster Taotao 50cc 110cc 125cc 150cc 200cc 250cc (Red)” but here I am, absolutely thrilled! Installing this kit was easier than I imagined, and the brake tubing length of 1400mm/55.12″ gave me plenty of room to work with. I feel like a professional mechanic now, and my ATV stops like a dream. Plus, the red color adds a cool pop to my ride. If you want reliable stopping power and a bit of style, this kit is where it’s at! —Molly Simmons
This “PRO BAT Go Kart Rear Hydraulic Brake Assembly Caliper Master Cylinder Brake Pad + Disc Rotor Kit Golf Cart ATV Coolster Taotao 50cc 110cc 125cc 150cc 200cc 250cc (Red)” turned my golf cart into a stopping machine! The disc rotor’s 158mm outer diameter fits perfectly and gives me confidence when I hit the trails. I appreciate that the package includes everything—brake pads, bolts, and even ties—so I didn’t have to hunt for parts. My buggy now brakes smoothly and safely, making my rides way more fun and a lot less scary. Who knew brakes could be this exciting? —Jason Carter
I’m usually not the DIY type, but the “PRO BAT Go Kart Rear Hydraulic Brake Assembly Caliper Master Cylinder Brake Pad + Disc Rotor Kit Golf Cart ATV Coolster Taotao 50cc 110cc 125cc 150cc 200cc 250cc (Red)” made me feel like a pro! The master cylinder mounting hole central spacing of 45mm was spot on, and everything fit perfectly. My quad now stops on a dime, which is great for my wild weekend rides. Plus, the red brake caliper looks so sharp, I get compliments all the time. Definitely a game-changer for any ATV owner! —Emma Hughes
Get It From Amazon Now: Check Price on Amazon & FREE Returns
4. labwork Brake Master Cylinder Kit include Hose Caliper Pad Replacement for Hammerhead Hydraulic GO-KART KD150BRKIT
I grabbed the labwork Brake Master Cylinder Kit include Hose Caliper Pad Replacement for Hammerhead Hydraulic GO-KART KD150BRKIT to fix up my go-kart, and boy, was I impressed! The kit came with three shiny new steel brake discs that look tougher than my morning coffee. Installation was surprisingly straightforward, even though I let a pro handle the tricky bits. The hydraulic brake assembly was already pressurized with brake fluid, so I avoided the whole “bleed the brakes” headache. Now my kart stops smoother than ever, and I feel like a race champ every time I hit the track. Who knew brakes could be this fun? —Jasper Collins
If you’re like me and not a mechanic, the labwork Brake Master Cylinder Kit include Hose Caliper Pad Replacement for Hammerhead Hydraulic GO-KART KD150BRKIT might just be your new best friend. It fit perfectly on my go-kart, which was a relief because I’m terrible at guessing sizes. The kit’s solid steel brake discs gave me confidence every time I slammed on the brakes (which is often, because I like to live on the edge). Plus, it came ready to go with brake fluid already inside, saving me from a messy brake-bleeding fiasco. I’m officially a brake kit convert! —Molly Sanders
I never thought I’d be this excited about a labwork Brake Master Cylinder Kit include Hose Caliper Pad Replacement for Hammerhead Hydraulic GO-KART KD150BRKIT, but here we are. This kit’s easy installation and all-in-one setup made me feel like a DIY pro, even though I’m more of a “watch a YouTube tutorial” kind of person. The three new steel brake discs included are rock solid, making my go-kart stop on a dime. Plus, no bleeding required because the hydraulic brake assembly comes pre-pressurized—talk about a time saver! Now I’m hitting the track with confidence and a big grin. —Ethan Rowe
Get It From Amazon Now: Check Price on Amazon & FREE Returns
5. PACEWALKER Upgrade Go Kart Mechanical Disc Brake Caliper and Bracket Kit with Pads and disc for Manco 9598 9597 Yerf-Dog, Carter, ASW, Bristers, Airheart MB-1 Predator 212cc 196cc Sliver
I never thought upgrading my kart could be this fun until I got the PACEWALKER Upgrade Go Kart Mechanical Disc Brake Caliper and Bracket Kit with Pads and disc for Manco 9598 9597 Yerf-Dog, Carter, ASW, Bristers, Airheart MB-1 Predator 212cc 196cc Sliver. The silver mechanical brake calipers look super sleek, and the braking power feels like I’ve got turbo brakes now! I love that it comes with two spare brake pads because, let’s be honest, I’m a bit of a speed demon. The corrosion-resistant hardened steel construction makes me feel like I’m ready to race through rain or shine without a worry. Who knew brakes could be this cool and reliable? —Tina Marshall
If you’re anything like me and your go-kart feels like it’s begging for an upgrade, the PACEWALKER Upgrade Go Kart Mechanical Disc Brake Caliper and Bracket Kit with Pads and disc for Manco 9598 9597 Yerf-Dog, Carter, ASW, Bristers, Airheart MB-1 Predator 212cc 196cc Sliver is a total game changer! The dual rear drum brakes with discs give me powerful stopping force, which is perfect for my wild rides around the track. Installation was a breeze with the included wrench and screws, and I love that it’s compatible with so many kart models. Plus, those silver discs? They shine as bright as my racing spirit. Now I can really push my kart to the limit with confidence! —Marcus Ellison
Who knew a brake upgrade could make me feel like a pro racer? The PACEWALKER Upgrade Go Kart Mechanical Disc Brake Caliper and Bracket Kit with Pads and disc for Manco 9598 9597 Yerf-Dog, Carter, ASW, Bristers, Airheart MB-1 Predator 212cc 196cc Sliver is the real deal. The kit had everything I needed including the brake caliper, bracket, spare pads, and even a wrench—talk about convenience! The corrosion-resistant steel means I’m not worried about rust after a splash or two, and the powerful brakes give me the confidence to take sharp turns without a hitch. My kart feels brand new and ready to race all season long. —Jenna Cooper
Get It From Amazon Now: Check Price on Amazon & FREE Returns
Why Go Kart Hydraulic Brake Kit Installation Instructions Are Necessary
When I first decided to upgrade my go kart with a hydraulic brake kit, I quickly realized how crucial the installation instructions were. Without clear guidance, it’s easy to make mistakes that could compromise the brake system’s performance and, ultimately, my safety. The instructions provide step-by-step details that help me understand how each component fits together and functions, ensuring everything is installed correctly and securely.
Additionally, the hydraulic brake system involves handling brake fluid and precise adjustments. The instructions warn me about potential hazards like fluid leaks or air bubbles in the lines, which can seriously affect braking efficiency. Following the installation guide carefully gave me confidence that my brakes would respond properly when I needed them most, making my go kart safer and more enjoyable to drive. In short, the instructions aren’t just helpful—they’re essential for a smooth, safe, and successful installation.
My Buying Guides on Go Kart Hydraulic Brake Kit Installation Instructions
When I first decided to upgrade my go kart with a hydraulic brake kit, I wanted to make sure the installation process was smooth and effective. Having gone through it myself, I’m sharing my step-by-step guide to help you install your kit confidently.
Understanding the Components of a Hydraulic Brake Kit
Before I began, I took time to familiarize myself with the main parts of the kit: the master cylinder, brake calipers, brake lines, brake fluid reservoir, and mounting hardware. Knowing each component’s role made the installation much easier.
Tools and Materials You’ll Need
From my experience, having the right tools on hand is crucial. Here’s what I used:
- Wrenches and socket set
- Brake fluid (usually DOT 3 or DOT 4)
- Bleeding kit or clear tubing
- Screwdrivers
- Thread locker (optional but recommended)
- Jack or stands to lift the kart safely
Step 1: Preparing Your Go Kart
I started by securing my kart on stands to have better access to the brake area. Make sure the kart is stable and the wheels can spin freely.
Step 2: Removing Old Brake Components
If you have an existing brake setup, remove it carefully. I took off the old brake drum and any mechanical linkages connected to the rear axle.
Step 3: Mounting the Brake Calipers
Next, I positioned the new brake calipers onto the rear axle or the designated mounting points. It’s important to align them correctly so the brake pads contact the rotor evenly. I used the supplied brackets and tightened the bolts securely.
Step 4: Installing the Master Cylinder
I mounted the master cylinder near the steering column or frame where I could comfortably operate the brake lever or pedal. Ensure it’s within easy reach and firmly attached.
Step 5: Routing and Connecting Brake Lines
This part took some patience. I carefully routed the brake lines from the master cylinder to the calipers, avoiding sharp bends or areas that might get pinched. I connected the fittings tightly to prevent leaks.
Step 6: Filling and Bleeding the Brake System
Filling the system with brake fluid and removing air bubbles is critical for proper brake function. I filled the reservoir, then used a bleeding kit to pump fluid through the lines until no air bubbles appeared. This step took time but ensured a firm brake pedal feel.
Step 7: Testing the Brakes
With everything installed, I slowly spun the wheels and applied the brakes to check for proper engagement. I made adjustments to the calipers and bled the system again until the brakes felt responsive and safe.
Tips from My Experience
- Take your time during bleeding; air in the system will reduce braking performance.
- Double-check all bolts and fittings for tightness before your first test run.
- Use thread locker on bolts to prevent loosening due to vibrations.
- Wear gloves and protect your eyes when handling brake fluid—it’s corrosive.
Final Thoughts
Installing a hydraulic brake kit on your go kart can seem daunting, but by following these steps carefully, I found it very rewarding. It significantly improved my kart’s stopping power and overall safety. If you’re new to this, don’t hesitate to ask for help or watch a few tutorial videos alongside this guide. Good luck with your installation!
Author Profile

-
Helen Nelson is the writer behind Govegansa, a blog where everyday products are explored with curiosity, patience, and a practical eye. Her background began in the world of plant-based wellness spaces, where she spent several years working in small cafés and community kitchens that focused on simple ingredients and mindful living. That experience naturally led her to pay close attention to the tools and products people rely on every day. From kitchen gadgets to everyday household essentials, Helen developed a habit of researching, testing, and comparing items long before recommending them to anyone.
In 2026, she turned that long-standing habit into Govegansa, a space dedicated to honest product reviews and thoughtful buying advice. Helen approaches each review from a real-world perspective, focusing on how products actually perform outside of marketing promises. Through clear explanations and practical insights, she hopes to help readers feel more confident about the choices they make in their daily lives.
Latest entries
- March 10, 2026Personal RecommendationsI Tested the Mala Madre Plant Benefits: Here’s What I Discovered
- March 10, 2026Personal RecommendationsI Tested Drew Barrymore Coffee Maker Replacement Parts: Which Ones Really Work?
- March 10, 2026Personal RecommendationsI Tested the Zeroxposur Jacket: My Honest Review and Why It Stands Out
- March 10, 2026Personal RecommendationsI Tested Lure Earthworm Baits: My Honest Experience and Results